Thursday, May 8, 2014

Laura Geller Beauty : Love Me Dew Trio

Ever since I started to take advantage of the super accessible beauty stores here in USA (yes, I am talking about our beloved Ulta and Sephora :) ), I am always eager to to try out different cosmetics brands. Laura Geller Beauty is a cruelty free prestige cosmetics brand launched by its founder Laura Geller on QVC in the year 2002. I love and admire a brand that has a strong woman at its roots. You can read more about it here.


During the recent "21 Days of Beauty Steals Event" in Ulta, I got two kits from Laura Geller. I have been totally enjoying the few products that I have started using since then.

Today, let us discuss the "LOVE ME DEW TRIO" consisting of 3 moisturising lip crayons weighing 0.10 0z (2.9 g) each. Individual crayons retail for $16 in her website, as well as in Ulta. The price for this kit is $25 i.e. $8 per crayon, very very affordable for the quality you are getting. I also noticed that in their website, net weight for individual lip crayon is 0.06 oz (1.9 g), but the ones in this kit weigh 0.10 oz (2.9 g)! Almost 1 g more; isn't that is awesome? Plus, I got a free I-care Waterproof eyeliner with my purchase. More reason to be happy!

The set is housed in a very simple yet sophisticated light-weight cardboard packaging. The actual lip crayon tube is made of sleek black plastic with the lip color showing up at the bottom; that makes it very convenient. These can be twisted upwards; so there is no need of sharpening.

Laura has definitely named these lip crayons very accurately. They feel super hydrating when you first put them on and goes on very smooth. They are reasonably long wear too. They are infused in Vitamin E, and described to have a balm-like texture. I have worn them for at least 6 hrs, while continuing with all kinds of drinking, eating and talking activities. After some hours of wear, there is a drying feel, but it also leaves a very nice stain, meaning you may get away without much need of touch-up. I believe, the color and texture of these crayons will be BEST for women who work in office environments and favour bold shades. Very easy to put in your purse too.

On to the colors now! If you love bold vivid colors, you will definitely appreciate the entire set. I am a very big fan of bright lips, my olive medium skin tone also helps me in experimenting with different colors :)

Plum Freeze: This is the deepest shade in the kit. Its a very deep berry shade; ideal for fall and winter. I also found that this color is a tad bit drying than the others.

Cranberry Glaze: This is a deep blue-based red which makes my teeth look really white :) I totally love wearing red lipstick and this is definitely my favorite from the set.

Dragon Fruit Sorbet: I was really apprehensive about this shade at first. It is a very bright fuchsia color. I never thought I will be able to wear it. But surprisingly, this looks really flattering on my skin tone, it brightens up my entire look. Such a pretty pretty spring color!! I would definitely be wearing it a lot for the coming 3-4 months :)

If you are not afraid of vivid colors you can very easily wear these lip crayons no matter what your skin tone is.


Here are my quick takes

Pros:
  • Very opaque, buttery in texture and very smooth in application.
  • Very very affordable value. 
  • Good range of colors.
  • Reasonably long-wearing.
Cons:
  • They are very hydrating. But, if you have super dry parched lips, these may settle in the fine lines of your lips by the end of the day.
  • I roamed around in the sun for an entire day with this in my purse. The fuchsia color got a little deformed at the tip. So be careful :)

If you are interested, you can find the kit in Laura Geller website and in Ulta, it is currently a permanent part of their Laura Geller Beauty offering. I will be definitely repurchasing once I run out of it :) Hope it was helpful!

Love,
~Aru

Monday, May 5, 2014

:::ধনিয়াৰ চাটনী (Coriander Chutney):::

This is going to be the simplest and shortest recipe I have posted till date :) This is definitely one of the most widely used and well-loved Indian chutney


For those who do not know what is chutney, it is a flavoured condiment, mostly spicy which can be paired up with almost anything to oomph up the taste of your food. 


We, Indians, have been pairing up coriander chutney with samosa, tandoori chicken, tandoori drumstick, paranthas or with a simple daal-rice meal :) It goes with almost anything.


Also, there are a lot of variations of this chutney. You can change up few ingredients and it will be different flavour of the same chutney. Today, I will be sharing the simplest of all the variations and a few pictures showing how I used it :)


Ingredients: Chopped coriander (one bunch, large stem may be removed), salt, green chillies, very few coves of garlic and same amount of ginger, a little bit of jeera (cumin) powder, few spoons of lemon juice depending on your taste.


1. Mix all the ingredients and grind it together till it appears smooth. That's it. You are all done :)


Also, you can refrigerate it in an airtight container and this will last you for at least 5-6 days. Simple, super easy to make and long-lasting, do we need anything more ?
:)


Love,
~Aru 

:::Tandoori style oven-broiled Chicken Drumsticks:::

So, it was a Sunday and as always I did not have much excitement going on for me! And because I already had some chicken drumsticks in my refrigerator, I decided to prepare some tandoori drumsticks or should I just name it oven-broiled chicken drumsticks. :)


First and foremost, this, again is a borrowed recipe. I always thought tandoori anything is a very terrifying recipe. I did not believe that I have the courage and patience to actually prepare such a long recipe. But, thanks to one of my friends, I finally realized this is actually pretty simple if I can manage the patience. A hat tip to her :). Lets go to the recipe straightforward. 

Ingredients: Chicken drumsticks, curd (aka plain yogurt), salt, garlic, ginger, paste, green chillies (optional, but I love the fresh smell of it), red chili powder, lemon juice, tandoori masala.


Important Note: From my few experiments, I can assure that the key to the success to this recipe is marination. I have succumbed to the temptation and prepared this dish when I did not have sufficient time. I have to accept that it did not turn out good.
  1. Remove the skin from the drumsticks, make few deep slits. There are two rounds of marination involved. I used the following proportions for 8 pieces of drumsticks.
  2. For First Round, mix juice from one small lemon, salt to your taste, 2 tablespoons of both ginger and garlic paste, red chili powder. Put the chicken pieces and marinate well so that the salty flavour can penetrate deep into the slits. Keep it for 30-45 minutes. 
  3. For Second Round, mix few tablespoons (I put 4) of curd with almost half amount of tandoori masala. Put the chicken pieces from the first marinade to this paste. 
  4. Keep this marination for as long as you want. I kept it around 10 hrs. But, at least 3-4 hrs is needed. 
  5. Broil it at 450° F in a conventional oven. Keep checking and turning the sides of the chicken pieces from time to time. When you put your fork into the pieces, you can gauge if it's properly cooked or not. Once you get a feel that it is cooked, and outer crust is a bit crisp, it should be done. It generally needs around an hour.
  6. Serve it as a snack or as a side dish to your meal. If you want a quick and easy recipe  of coriander chutney to go with the tandoori drumsticks, please click here :)

I enjoyed my crisp and well done drumsticks. I hope you will too :) 

Love,
~Aru

Friday, May 2, 2014

:::অমিতাৰ খাৰ (Papaya with Alkali):::

This is another staple from my kitchen. If you are an Assamese or if you have lived in Assam for a long long time, you must have experienced this culinary delight.


Well, as a matter of fact, we, Assamese people are commonly referred to as "খাৰ খোৱা অসমীয়া" (khar eating Assamese), which often has an underlying indication that we are a bit lazy in nature. That is definitely changing now. Nevertheless, we love our khars:)

In an ideal Assamese meal, we generally start off with khar. You can make a khar dish with different primary ingredient like papaya (Assamese synonym: Amita), spinach, black gram, night jasmine flower etc. In my home, papaya was most frequently used.

Amitar Khar (papaya with alkali) in an Assamese household will usually include fish head from larger fishes (typically Rohu). The succulent fatty and pulpy taste of the fried fish head amalgamates with the alkali and slightly sweeter flavour of the unripe papaya to create this mouth-watering taste that every Assamese loves :) And the crunchiness of that fried fish head!! Yummmmmmy!!! It is not always easy to find Rohu here, so I have had substituted fish head with regular fish pieces or smaller fishes like Mua fish or younger Catfish. You can even skip the fish altogether. It is still going to taste awesome. 

Traditionally, khar is made from burning or sun-drying a typical banana tree stem or banana peel. The ash produced thereafter is mixed with water! The water is what we call khar. Generally for one meal serving 4 people, you don't need more than 3-4 teaspoons. But, this is definitely not the easiest way to prepare khar, specially if you are living outside Assam. "Baking Soda" is the most easiest and widely used alternative. Taste wise, it performs exactly the same. 

So here it goes...
Ingredients: Mustard oil (highly recommended), Red Chili, Bay Leaves, Pas Furon (five spices mix) or Mustard Seeds, Salt, Unripe PapayaKhar or Baking Soda, Fish-head or other fish pieces, Turmeric Powder (for fish pieces), Green Chili (optional), Potato (optional)

Important Note:
  • Make sure to get an unripe papaya. Even a slight ripe papaya may make the taste undesirably sweet.
  • Keep in mind that there is no need of onion, garlic, ginger or any kind of spices. I have seen khar recipes with these ingredients, but I really prefer making mine with the minimal spices and ingredients.
  • Be extremely careful about the amount of soda you are putting. More amount is going to leave a bitter aftertaste.
  1. Peel off the papaya, scoop the seeds, slice it and chop into small thin pieces. This may take a generous amount of time, specially for a larger size papaya. But the thinner the pieces, the lesser is the cooking time.
  2. I like to marinate the fish head with salt and turmeric for few minutes. Fry in your choice of oil. Make sure it is well fried.
  3. Heat mustard oil in a pan. Add the mustard seed/pas furon, bay leaves and red chillies when the oil is properly heated. The seeds will start to splatter (So be careful ;))
  4. Add papaya and potato pieces. Stir occasionally.
  5. After few minutes add salt and the soda. For a rather big-size papaya, 1/2 spoon soda should be enough.
  6. You will see the papaya pieces dissolve almost immediately. Keep stirring occasionally.
  7. Once you feel that the papaya is almost cooked, add the fried fish head. I try to break it into smaller fragments. This helps in allowing the flavour of the fish melt into the papaya.
  8. Cook for some more time.
  9. Serve with rice.

This is one of my "all-time favourite food". I am pretty sure, if you are from the land of Assam, you already have attempted or will attempt this recipe at least once in your life. :) And if the whole concept of alkali as food is totally new to you and you decide to experiment; I would love to know more. Comment below :)

Love,
~Aru

Thursday, May 1, 2014

IT Cosmetics Naturally PRETTY Vol. 1 Matte Luxe Transforming Eyeshadow Palette

First of all, how clever is that name? Every woman wants to be naturally pretty. At least, we all want to look pretty :)

This is my first ever product from IT Cosmetics which is a cruelty-free, prestige brand of cosmetics for face and body, founded by present CEO Jamie Kern in 2008. It is a relatively new product and have not yet been talked about a lot in the beauty community. I was itching to check it out ever since I heard about it. The name is really catchy :) Most of the eyeshadows I own are shimmery and I often found myself looking for matte crease colors to finish off my looks. I saw and swatched this palette in ULTA during their "21 days of Beauty, Spring 2014" event. The shadows are pigmented and felt so smooth and buttery in my hand! I admit I don't own a thousand and one eyeshadows but these colors are very very pretty and looked so unique to me. I was immediately sold!! But I did not buy it that day, as I already hoarded up a lot of stuff. I was just trying to be a good girl you know :) 

Few days later I received the 'Friends and Family - 25% off coupon' email from IT Cosmetics. They also offer free US shipping on orders of $25; obviously I could not resist the temptation. The regular price of the palette is $42. It contains 14 matte eyeshadows and a transforming pearl shade all of which gives a total of .092 oz (2.62 g) of products. For me, it is definitely worth the price. With the coupon, it costs me $31.50, such an awesome price! Basically, I am very happy that I succumbed to my makeup addiction.

In case you are wondering, that's me in the pictures with my makeup ;) 
The outer packaging is a pink cardboard. The actual palette is also made of cardboard packaging with a velvety pink-colored fabric. I like it; my only complaint is that it is not going to be easy to maintain. It has a magnetic covered-up closure, so it feels sturdy to me. You get a decent size mirror inside. The inner frame is made up of golden colored cardboard which makes the palette look luxe and elegant. I love it.


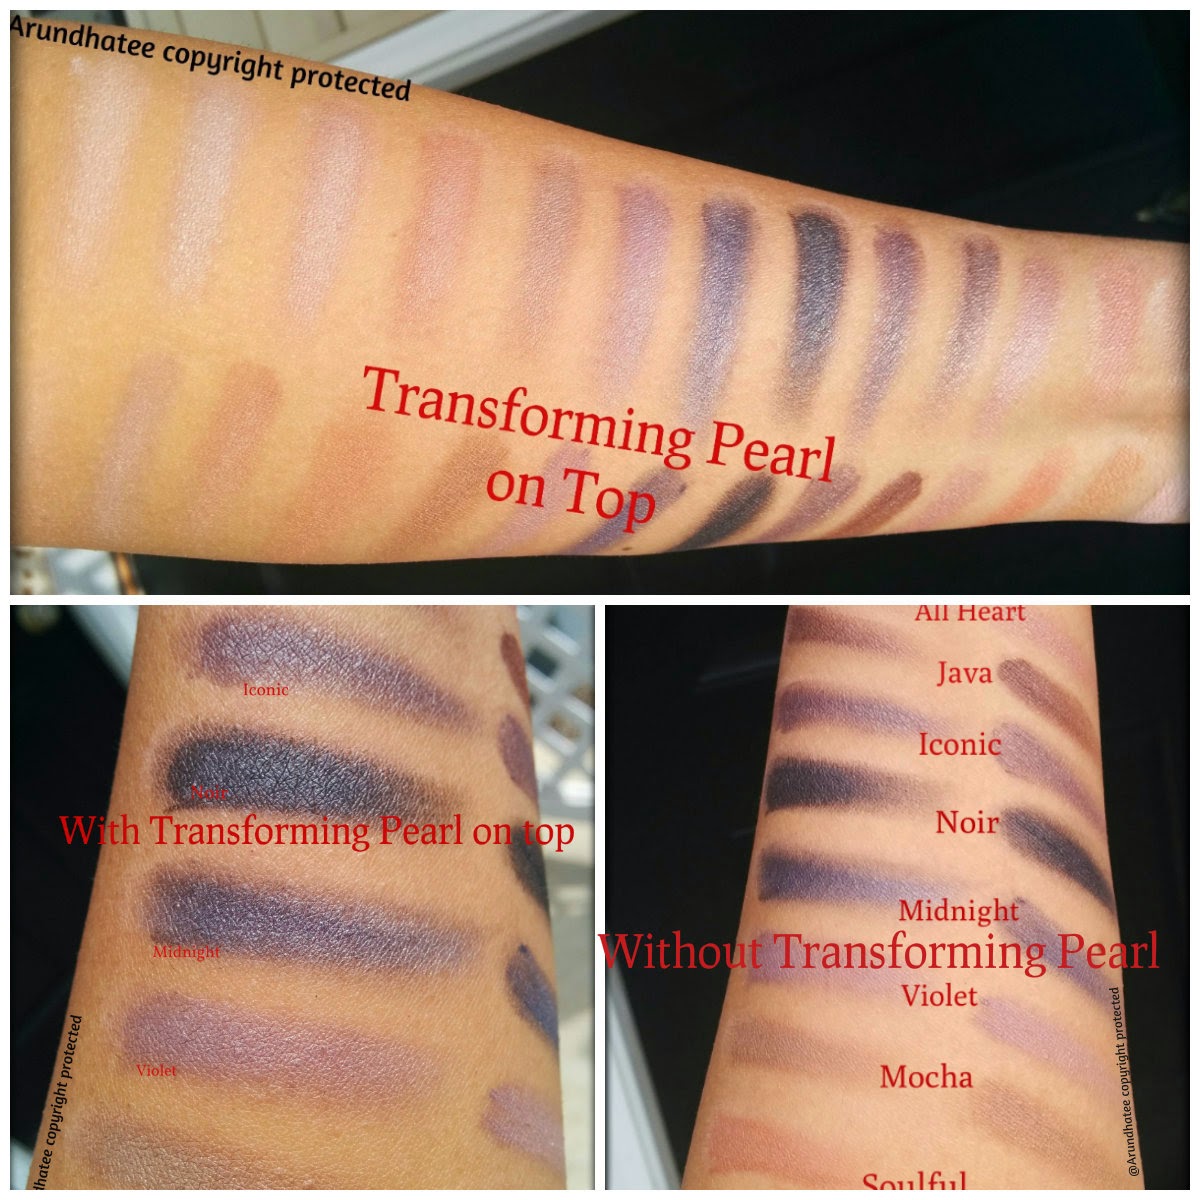
This is termed as Vol. 1, so there is a chance that they will come up with different editions. The color range is awesome. You get two light shades, few mid-tone colors and then some really darker shades. Needless to say, they are all matte in texture. I feel I have every single crease colors I may ever want! They also can be worn wet or dry. Jamie worked out with plastic surgeons to develop these anti-aging shadows infused with Peptides, Hydrolyzed Collagen, Acai, Green Tea, Silk and antioxidants! Qualitywise, they are very pigmented, smooth and extremely easy to apply as well as blend out. The dark colors have a tiny bit of fallout but nothing too crazy. They also have such awesome staying power; around 10 hrs of wear for me without any distinguishable fading. The other day I put on a smokey eye using Warmth, Midnight and Noir at around 11 am, since it was my day off, I continued with household chores without being careful about my makeup. I even took a 30-min nap wrapping myself in blanket :). The shadows did not budge, I could go out without any touch up needed. 


Let me try to describe the colors for you...
Sheer Joy: This cream color is the lightest among all. Definitely a great crease color for paler skin tones. Excellent brow bone color for me.
Soft Light: Another great crease and brow bone color. Appears as a very muted light brown/taupe color to me.
Warmth: This is a brighter brown; almost undetectable on my skin tone; perfect everyday crease color for me.
Soulful: Looks like a very well-balanced mix between brown and mauve. Extremely pretty.
Mocha: Pretty brown/taupe, however you see it ;)


Violet: Very true to its name :) Such a pretty pretty color. Definitely going to help me in finishing of a purple smokey look.
Midnight: Dark blue comes to my mind whenever I hear the word "Midnight". The color is exactly that. Definitely very useful in creating navy smokey eye looks.

Noir: Matte black. Very pigmented but it also has the most fall outs among all the colors.
Iconic: Very pretty dark purple. Pair it with a Violet for a very elegant look :)
Java: Classic brown.
All Heart: I love how IT cosmetics named these shadows, very crisp and beautiful. All Heart is a more pronounced mauve color.
Sunset: Such a lovely lovely shade. It shows up as a muted orange color, definitely resembles colors of sunset.  It is very hard to choose, but this might be my most favourite among all.
Sunrise: Hmmm, I don't know how to describe this color. A brighter orangy brown color but not too over the top.
Love: A lovely pale pink color, very apt for my brow bone.


Transforming pearl: This is the bigger color in the palette. This can be used on top of the any shades to transform it into shimmer. As in the picture, I don't see much of a difference. Plus the pearl makes the color less vibrant, not something that I enjoy. I love the palette so much that I really don't care about the pearl shade and its performance. I am still going to use it as an eyeshadow to brighten up my tear-duct.
Here are my quick takes:
Pros:
  • This palette makes me happy, definitely a plus point for me :) :) :)
  • Shadows are velvety, buttery and pigmented. Very easy to blend out. I am very impressed by the quality of these shadows.
  • Awesome staying power.
  • Very impressive range of color.
  • Good value when compared to some other palettes.
Cons:
  • The only con I could think of is the fallout. But, nothing too serious :)
If you are a matte eyeshadow fan, I recommend you getting this palette. You will definitely fall in love. Even if you don't LOVE mattes, this is a pretty palette to have. I realize, this has become quite a long post, but I have been really enjoying this palette so much. Hope it was helpful.

Last but not the least, I love the quote by Jamie, on the back of the packaging "You are naturally pretty, you are beautiful, you are one of a kind, you are it!". 

Love,
~Aru

P.S.: As of now the palette is avaliable in ULTA ($42), and in QVC with a double ended brush ($39.56). 

Wednesday, April 23, 2014

LORAC Rockin' Red Hot Lip Gloss Collection

Before I left India, the only cosmetics brand I properly knew about was Lakme. I faintly remember hearing about Avon, Elle, Maybelline and Revlon. But I had absolutely no idea that cosmetics are widely categorized as drugstore and high-end brands. Since last Christmas, I have been binge watching thousands of beauty videos in YouTube and educating myself about so many wonderful brands. Like every other girl, I want to pamper myself and buying one or two high-end product definitely gives me that feeling.


This "Rockin' Red Hot Lip Gloss Collection" from LORAC was in fact the very first high-end product I bought for myself. LORAC is the cosmetics brand by celebrity makeup artist Carol Shaw. [Fun fact: Lorac is CAROL spelled backwards, pretty clever idea to name your own brand, if you ask me :)]. I picked this kit from Kohl's just after Black Friday. It was just $27 for 6 full-size lip glosses, I am not 100% sure about their regular price, but I can definitely tell its an awesome value kit. This kit was also available in ULTA and Kohl's for quite a few weeks after the holiday season. And I guess I have already mentioned that I love me some good value kits, definitely a very good way to try out new products. Naturally, I had to pick up this kit :)


This is a 6-piece lop gloss collection housed in a fierce red cardboard packaging , nothing special about it though! But the packaging of the actual tube is really really pretty and elegant. The cap of the tube is adorned with tiny rhino stones which definitely goes very well with the holiday feeling. Apart from the super affordable price, this cute packaging made me buy the kit.

I am however, not very impressed with the product. I like the color range it offers. It has everything from nude to coral to deep shades like fuchsia and violet. As described in the packaging, the glosses are paraben-free, definitely a good thing. The texture of the gloss is very very sticky. I really don't like my hair sticking up on the lips whenever I apply these glosses. There is a faint smell as well, but for me, its not overpowering. The staying power is also quite satisfactory, for me it stayed up to 3-4 hours on me without any drinking or eating activity. Besides all its qualities, personally the stickiness that comes with it makes me kind of unhappy about the product. If that is something that does not bother you, you will definitely enjoy these glosses. And yeah, not a big fan of the brush applicator.


Rock It: Described as a coral shade, it also has some shimmer on it. Its a lovely shade plus the shimmer comes out very very subtle once you apply it. I like that.
You Rock: It is described as plum shade with similar kind of shimmer. I really like this color, especially for everyday wear. 
Rock On: It is a pretty pink color with tiny shimmer. Nice color.


Rock n' Roll: It is described as a pink nude, but on me it appears as a very ashy nude color. It also has the same kind of shimmers.
Easy Rock: It is described as a fuchsia color, however it is not very opaque or much pigmented. Hence it shows up like a light pink color on me. And yeah, this does not have any shimmer in it.
Rock Star: Described as exclusive violet, this shade looks really deep and dark on the tube. But when I apply, I don't get as much pigmentation as I would have expected from the color. This is also shimmer less as Easy Rock.

So here are my quick takes
Pros:
  • Awesome value.
  • Adorable packaging of the tube.
  • Good range of color.
Cons:
  • Very very sticky texture.
  • Does not show up as pigmented as I had hoped.
  • The colors when applied, does not look much different from each other :(
  • Not a fan of the brush applicator.

Despite not being overly impressed with these glosses, I have been getting quite a lot usage from them. I mostly use them on top of my not so wearable nude lipsticks, just to cancel out the ashy looks from those colors. I often pack one of these glosses whenever I am travelling for work. Great for bringing out some brightness to the lips especially if your work or study environment does not allow much use of bright colors. I also think they will be great stocking stuffers. I can also mix one of these glosses with few other beauty items and I know it will make a great gift for my cousins or friends whenever I am visiting India for my next vacation.

Hope it was helpful :)

Love,
~Arrru

Wednesday, April 9, 2014

::: তিল দিয়া কুকুৰাৰ মাংস (Sesame Chicken) :::

If you happen to browse through my first food related post, you already know that I am always after easy-to-cook recipes. Plus, I am not a very versatile cook. Because of my work and lifestyle, I am kind of compelled to eat outside for most of the time. And so, whenever I cook, I tend to favor recipes of Assamese cuisines that reminds me of my childhood. It is kind of my way to deal with the fact that I miss home and my mom's awesome cooking.


Sesame seeds are very popular in Assam and are widely used in our cooking. I remember my mother spicing up a monotonous everyday meal with a simple sesame chutney made with garlic, chilies and tiny drops of mustard oil. As I have heard from my elder generation, sesame seed helps in maintaining jet black color of hair, if you prefer black as your hair color :),  as well as nourishing them. The same sesame paste can also be used to flavor up a simple chicken curry

I don't remember having this specific delicacy very often back home in India. Recently one of my very adorable friend prepared this recipe one day for a dinner invitation. It was just too good to taste this flavor after so many years. I was immediately intrigued , because, like me, she also prefers recipes that require less time and effort. A big thanks to her for sharing the recipe.

So here it goes

Ingredients: Chicken, Sesame Seed, Red Chili, Bay Leaves, Pas Furon (five spices mix), Garlic, Cumin Powder, Coriander Powder (Optional), Turmeric Powder, Salt, Chili, Ginger, Garlic, Onion, Big Pieces of Potato (optional)


1. Make a paste of ginger and garlic. Chop some onions.
2. Heat mustard oil in a wok (you can replace mustard with any other oil of your preference, but I like the authentic flavour of mustard oil). Add dry red chilies, bay leaves, pas furon and chopped onions.
3. After 2-3 minutes, add the garlic-ginger paste, chillies, turmeric powder, cumin powder, and coriander powder if you like. I am not much fan of coriander powder, so I always skip it :). One key aspect of this recipe is the absence of Garam Masala which is almost a must have in any chicken curries. I believe the flavour of both sesame seed and Garam Masala will be clashing.
4. Add chicken pieces, potatoes and salt.
5. After the chicken is almost cooked, add the sesame paste. Stir till you feel the paste is cooked.
6. Add water per your required consistency. I like it to be a little thick.
7. Serve with rice or naan.

I am not very rigid about ingredient measurement while cooking. For me, cooking is an experiment with trial and error method. This is the first time I cooked Sesame Chicken. When finished, I realized that I put a little too many spoons of the paste and hence the sesame flavour came out a little bit overpowering. But that happens with experiments :) The bottom line is, you should be a little bit careful about the ratio of chicken to sesame paste. I think 3 teaspoons for 1/2 KG (i.e. 1.1 lb) of chicken should be good.


Hope you all enjoyed an easy-to-cook yet flavourful dish from my home state of Assam, a very beautiful place in north-east India.

Love
~Arrru