Saturday, January 30, 2016

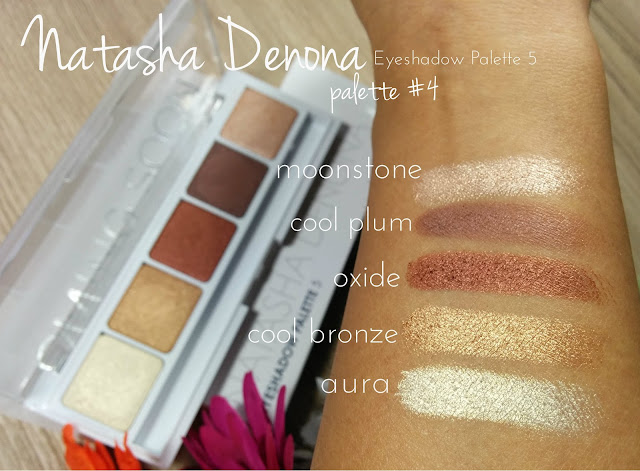
Review and Swatches ::: Natasha Denona Eyeshadow 5-pan Palette #04!!!

Beautylish is launching Natasha Denona Eyeshadow Palettes very soon! This makeup line is originally from Egypt and has suddenly become very, very popular among makeup lovers! Internationally famed Makeup Artist Natasha Denona established this line some time back but because it ships from Egypt it was not quite readily accessible to consumers in USA. But don’t worry, like many other niche brands that Beautylish has facilitated to set up shop here in USA, Natasha Denona is also coming to an e-store near you :-) Sign up here for early access!


This line has quite an extensive range of products but it is most loved for the metallic eyeshadows. There are 28-pan palettes, 10-pan palettes, 5-pan palettes and also a wide range of single shades. She has a total of 13 different 5-pan palettes! Today I am talking about her Eyeshadow Palette 5 Number 04

Before digging deeper, let’s talk about the price. Apart from the quality they are also “infamous” for the price range! These are some of the “costlier” eyeshadows in the market! Regular single pan eyeshadow costs $27 to $29 for 0.08 oz. of products! This palette has 5 full size shadows (which are also available as single pan) at a cost of $48. So, there is almost 100 bucks of savings right there!! I got this palette in this year’s Lucky Bag from Beautylish so I did not exactly pay $48, you check the breakdown here. Let’s compare the price with some of the shadows that I think are a bit similar in style for, e.g. Makeup Geek Foiled shadows! They are $10 each, so if you are hunting for just one shade, then it’s definitely much more affordable. But if you happen to get 5 or more shades it will cost you more than the Natasha Denona palette. Bottom line – these are rather pricy products but when you buy the palette the price is much “easier-to-justify”! My advice is- “do your math before buying!”

Packaging-wise I do think they have a lot to improve! It looks quite cheap to be honest; I would have liked a sturdy, more elegant looking palette. It is compact which is good for travelling or to carry in your kit but the material is just plastic with a very clear and somewhat flimsy lid. I am afraid that there are risks of breakage if you travel a lot with this. There is no mirror as well. At this price point I don’t expect this type of packaging!


Now on to the fun and exciting part! This palette as 5 shades all in metallic finish and in neutral warm fall-ish shades! They are very strongly pigmented shadows! I believe they are pressed pigments (don’t count me on that!); so these are quite creamy in formula. When I swatch them with my finger, they feel a little bit stiff and not as soft as some of the other metallic shades I have from different brands. But I don’t feel this rigidity or hardness when applied on the eyes. They blend very easily and very quickly! They can also be easily layered over each other! Like I said, these are very creamy in formula so without any primer underneath they started to crease within 4-5 hrs; I expected that. With primer, it lasts the 7-8 hrs. if I am in an indoor environment. The other day, I had a light layer of “oxide” over Mac Paint Pot and spent at least 5-6 hrs. running around in a refinery, so it creased a little bit and the pigmented got deposited on the middle of my lid! But it was not horrible at all. I would definitely prefer a bit stronger wear time but overall I do love the quality of these. 


Here are the shades –
25 M (aura): it’s very light yellow-y beige metallic shade! It almost looks glittery but with very fine micro glitter. It’s a little too light for me to use as an over-all lid shade but if you have lighter skin tone than me, this will be beautiful. I use it just at the center of the lid to create a “halo” effect.

31M (cool bronze): I don’t understand why it is called “cool bronze”. It’s definitely bronze but no way it’s cool! It is a very, very warm golden type bronze. Personally I believe these types of shade are very flattering on me :-) I mostly wear all over my lid; I specially love to wear a light layer for everyday wear-to-work look!

63M (oxide): Another favorite shade; actually this might be my most favorite. It’s a very warm coppery-maroon. I love this shade. This is the color I automatically grab to apply whenever I am using this palette.

70P (cool plum): This is one or two shades darker and browner than 63M. Even though it is mentioned as “metallic” like the others I feel this has less glitter and is less metallic in finish; I actually enjoy that! It’s also much softer to touch. I love using it on my outer-v, works great on the lower lash line and because it is not as metallic as the others it can be used on the crease as well. Overall, this is the most useful shade in this palette for me!

59M (moonstone): This has the same formula and texture like 25M. It’s a peachy coral apricot type of shade. It shows up a little lighter on the eyes than when swatched on the hand. 


Overall, I love this palette. I also like the fact that every skin tone can use all of these shades in some way or the other. The only thing I am still struggling with is to come up with different looks! I love vibrant colors and all these shades being monochromatic I always end up wearing the same type of look. I guess I have to try harder.


Overall, I am really enjoying the palette. For me it was worth the investment! :-) If you love metallic shades and are a big fan of neutral warm shades you will definitely enjoy this palette. I just received number #1 palette today and that’s much more versatile in shade range. I am really excited to play with that :-)

Love,
~Arrru

Saturday, January 23, 2016

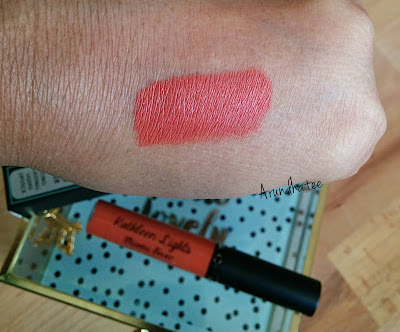
Review and Swatches ::: OFRA Cosmetics X Kathleen Lights "Miami Fever"!!!

I never knew of OFRA Cosmetics until earlier this year! It mostly caters to professional Makeup Artist’s needs. Their liquid lipstick suddenly had become quite popular among the general consumers as well. They recently had collaborated with a very popular YouTube Vlogger Kathleen Lights to bring out two limited edition shades! Today, I am talking about “Miami Fever” which was the first instalment in this collaboration.


OFRA is mostly online only (or I am not aware of any stores that carry OFRA) and they don’t offer free shipping. The regular price of these lipsticks is $19 which I consider a bit steep! For these two reasons I decided not to get it when they first released around the onset of Fall, ’15.

But then, there was the 50% off Black Friday sale and I gave in to the temptation :-) The shade looked quite unique and intriguing to me and I thought if there is a time to try it, this is it! With 50% off and 3.99$ shipping (which is a lot by the way) it cost me a total of $13.90. But I am sure there are some other discount codes.

After refraining myself for long, I finally tried a few liquid lipstick formulae this year. I also have realized that my lips are a bit too matured and wrinkle-y for them :-) Kat Von D liquid lipstick is the only one that does not show up very dry and that flaky. A lot of people love OFRA Cosmetics liquid lipsticks mainly because of the formula but I had mixed experience. It is quite a thick formula but still easy to apply evenly and put on a second layer without looking patchy. But most of the time I am happy with one layer application. The applicator a typical one and it is easy to get a sharp line around the edge of the lips. It dries down within a minute but not completely; basically it is not transfer proof!  But it does have incredible staying power, except very rarely I have seen it disappearing in patches from my lips but otherwise it stays on until I remove it. Every time I wore it, I had at least 2-3 cups of tea or coffee, good heavy Indian meal and multiple cups of water. I am amazed to see how strongly it adheres to my lips. I have to admit though that it does show all my fine lines and makes me realize that my age shows up on my lips. I am quite torn as I cannot decide if I love it or not.


Let’s talk about the packaging. Considering they are retailed at a regular price of $19, the packaging is not at par. It is a glass tube, but it does not look quality material! The product name etc. are just wrapped around with a glass sticker - not at all worth $19. The applicator is ok though!


Miami Fever is a unique shade. It’s a burnt orange with a strong hint of red mixed within. Does not appear much unique in description but it has a lot of warmth to it. It is a tricky shade pull off though. It has a slight milky-looking aspect to it and on some unfortunate days it looks quite “washed-out” on my skin tone. But for the other days it looks quite flattering! I also have noticed that I need to prepare my skin; wear some base makeup, a bit of bronzer and blushes along with a defined eye-look, than it looks much better. I love bold lips; my beloved Ruby Way or Quince looks equally flattering when I wear them on bare face. 


Considering everything, I am not still able to make up my mind! I feel liquid lipsticks are quite personal! So, on you they might perform much better. While I don’t repent my purchase, it does not encourage me enough to check out the other shades!

What’s your thought on these?

Love,
~Arrru

Sunday, January 17, 2016

Products I've Used Up/Empties Vol. 5

After my last empties, I decided that instead of piling up my empty products I am going to blog about them after I have just 4-5 of them! But guess what, I did pile them up and ended up with this BIG FAT list of empty items to talk about. But hey, at least I am being good about using up my stash :-)


Not Your Mother's Deja Vu 'Do Style Extender (4 fl oz, $7.99): I got this in an Influenster VoxBox (reviewed here). The main idea here is to lock the oil in your scalp and keep your hair oil-free so that you can elongate the time between washing your hair. This definitely helps in restraining my hair from getting super oily between washes. It also has a strong fruity smell which does not linger a lot and it does not bother me much, but I am not a fan either. Also, I don't get my hair to shine if I use this. I happily finished this tube, but I don't think I will repurchase.

Parachute Coconut Oil: This is going to appear in almost all my empties posts :-) I have been religiously using it for deep overnight conditioning of my hair once a week as long as I remember :-) it helps in maintaining the moisture in my hair. I cannot live without this and I hardly ever shampoo my hair without using this overnight. Holy Grail product! :-)

It's a 10 Miracle leave-in Plus Keratin (4 oz, $20): I absolutely love this leave-in conditioner! It’s been much more than a year since my last hair-straightening treatment and hence my original hereditary crazy waves are coming back! May be because of that its effect has not been as mind-blowing as before. But it still does a great job in managing my uncontrollable wavy hair and makes them look smooth and presentable. I will continue to use it.

Equate Beauty Nourishing Nail Polish Remover: This is a super-affordable nail polish remover, I bought it quite some them back, so I don’t know if it’s still available. There is nothing great to talk about this but it definitely did the job! Of course, it needs a little more work to remove glitter polishes with this. But if you use the "aluminium foil" trick, it works wonders. I will definitely repurchase.


Lavanilla The Healthy Deodorent (0.9 oz, $8): It is a natural deodorant; as mentioned in their website there are "no Parabens, Petrochemicals, Phthalates, Silicones, Propylene Glycol, Mineral Oils, Synthetic Dyes, Sulfates, Chemical Sunscreens, or Aluminum". The scent is to die for! It's very relaxing, moderately sweet and peaceful. It's white solid stick type; glides on very smoothly, takes just a minute or two to dry and does not transform to the clothing. The longevity is not super impressive though! It gives me decent wear time during my normal work hours or when I am running just a few errands. Based on my experience, I don't think it will be 100 % effective for long time wear during heavy-duty tasks!! I reviewed it here a few months back, and I stated that I will repurchase, but I have changed my mind. After a few months of use, the product broke off inside the packaging and it became absolutely cumbersome to use it. Eventually I had to give up without being able to completely finish this. I am very dissatisfied, even though I enjoyed using the product itself.

Tarte Pure Maracuja Oil (1.7 fl oz, $48): I bought this with so much hope; it is such a loved product in the beauty community; I thought it will be the cure for the dry skin on my face. It is a good product but did not perform miraculously on me. I did like it while using it but after 6-7 months, the oil started to get thicker. I just recently ran out of it, I will observe if it is something that I horribly miss in my routine but otherwise I would not repurchase.

Ole Henrikson Truth Serum Vitamin C Collagen Booster (1 oz, $48): I finished up a tiny bottle of this in my last empties post. I do like the serum, and I have gone through almost 1 oz of this, but I have not seen anything phenomenal about it yet! At least not on me! Sephora Favorites Sets generally includes this in smaller size; If I repurchase, I will definitely get those instead of buying a full size.

Algenist Complete Eye Renewal Balm (0.5 oz, $65): To be blatant, I hated this balm. It did absolutely nothing and that’s sad for such an expensive product. It was very thin and sometimes it could not even take care of the dryness under my eye, let alone improve my “fine-line” situation. Also, as you see, the label on outer side flaked off completely, and I was always worried that those flakes will fall into the balm eventually getting in to my eyes. Definitely will not repurchase.


Fresh Sugar Lip Treatment Sunscreen SPF 15 in “Tulip” (0.15  oz, $24): I am so glad that this fancy but horrible product is finally over. I literally abused it in order to get it done with! I know Fresh lip balms have very loyal fans but this particular one did not work on me at all. I don’t know why! May be I got a bad batch or something. This was a very thick and super heavy lip balm. It just sits on my lips. I have tried their original formula and it much better than this. When I apply it, it makes me feel moisturized but yet I could see skin from my lips peeling off after 1-2 hrs. It’s a tinted balm, but the tint is quite strong and I always end up getting the lip balm all over my teeth, I have been embarrassed many times at work; I would just put it on mid-day without using a mirror and then later somebody will point out that I have lipstick on my teeth. I am never buying it again, not at least this shade.

Lakme 9 to 5 Flawless Creme Compact (9g, INR 500): Wohoo! My very FIRST big makeup empty (you know, if I ignore mascara and lip glosses). I am super excited! I posted a full review here a few days back. As much as spend money on skincare and beauty, when time demands, I can live very frugally. Plus being a bank manager’s daughter we were always encouraged to respect the value of money. So, when I see something getting TOTALLY used up it gives me immense joy! This is a cream to powder matte foundation and it was my very first base type of product. I used the shade "shell". It does not give full coverage but I liked the sheer to medium coverage I could get with this. My skin is much drier now so I do not like to use it on my face anymore. But I love to use it on my neck; the sponge applicator that came along, made it very easy to apply the cream on my neck super-fast and super-easy. For last year or more, I am exclusively used it for that purpose. Now that I have finished it, I am definitely missing it in my routine.  I may pick it up when I go home next!

Dior Addict Fluid Stick (.18 oz, $35): Now this is just a sample, but I have to talk about this! I got this sometime back from Sephora and I have loved each of the shade. The formula is so very comfortable on the lips, its so opaque and a pleasure to apply. It is slightly glossy in finish and it stays for a long time! If I already did own an unhealthy amount of lip products and if it was not this expensive, I would have bought at least one shade long time ago.

Make Up For Ever Setting Spray (4.22 oz., $30): Another sample that lasted for 3-4 usage. It is not enough time to tell if I really, really enjoy it. But I think it did work in some ways to make my makeup last a little bit longer. May be someday I will invest in this.

Buxom Lash Mascara (0.37oz, $20): Yes, this is also a sample. I am not typically picky about my mascaras, I don’t like hard rubbery kind of bristles like Benefit’s “They’re real”. But this one was very soft and I did really enjoyed using it.

Dior Diorshow Mascara (0.33 oz, $27.50): Like I said, I don’t really look for a lot in my mascara. I am fan of natural lashes, and it did serve me good. But I am not going to spend $27.50 for a mascara :-) 

Maybelline Moisturizing Mascara Remover (, $4.99): I bought this in some kind of a deal, so it was quite affordable. It does a decent job in removing the mascara but it leaves a lot of oily residue. I am using up my second bottle without much complain but I am not going to repurchase; my search for the absolute PERFECT mascara remover will go on!

Makeup Remover Cleansing Water (6.7 oz, $28): It is a simple and light makeup remover; certainly not for heavy duty makeup. When I reviewed it here, I did not like it that much, but after all these days I think I really grow fond of this. I use it to clean up the very last traces of makeup aound my eyes. Its so very gentle and almost soothing. I will surely repurchase.

Philosophy Purity Cleanser (32 oz, $55) : Overall, I think this is my very favorite cleanser by far. I love that you can really use this around your eyes without irritating them, if I were heavy eye makeup it is difficult to remove everything at one go. So, first I use a makeup remover to remove my mascara and then use Purity. I love the result. It is been few weeks since I finished it up, and I am definitely missing it in my routine. I have a 2 backups of this. But I have a different cleanser that I am using to finish up :-)


Treehut Shea Sugar Body Scrub (18 oz, $7.49): I got this in a bigger size during a sale. I love it, very very much. It’s a clean, summery and very fresh, very invigorating smell. It gentle scrub, but it works great to get rid of all my dead skin. It is really nice on my dry skin. I actually used it up long back, but I was repurposing the bottle. I think, last winter, I used it almost 2-3 times a week and it was really forgiving on my dry skin. I will definitely repurchase.

Soap & Glory The Righteous Butter Body Lotion (16.2 oz, $12) and Clean On Me Creamy Moisture Shower Gel (16.2 oz, $10): I loved both of this products last year specially the lotion and I have a detailed review here. The lotion has a very faint smell and I really enjoy it. It is an excellent moisturizer; very easy to apply and absorbs quickly. I have extremely dry skin and it works great on me during slightly warmer weather or between season changes.  But for heavy snowy winter here in my city, this alone is not quite strong enough. But I do LOVE this stuff and I already have backups.

The Clean On Me Shower Gel has a moisturizing product in built so it’s definitely feels moisturizing. It has the typical Soap & Glory signature sweet smell to it which I really enjoy! It is a good shower gel and I do have another bottle to go through that I will happily finish that up. But I don't think I will be repurchasing as I do love some other shower gels more than this. 


I am quite happy with the products I could finish this time. Hope you enjoyed the reviews too :-)

Love
~Arrru

Friday, January 15, 2016

নাৰিকলৰ লাৰু আৰু ভোগালী বিহু– Happy Bihu, everyone!!

If you hail from the beautiful state of Assam in the North East corner of India, your Facebook (or any other social media) feed must have been flooded with “Happy Bihu” wishes and “laru-pitha” photos from everyone. And just like me, if you live somewhere that is not Assam, you must be utterly nostalgic reminiscing good old days spent amidst family! You are also probably wondering when you can go back and participate in the hustle-bustle of the festivities.

নাৰিকলৰ লাৰু (Coconut balls)

Magh Bihuor “Bhogali Bihu” is one of the main cultural festivities in Assam. We celebrate 3 "Bihu"s that corresponds to the distinguished phases of harvesting season. “Bohag Bihu” is celebrated in the month of Bohag (mid-April) at the beginning of Assamese New Year to celebrate the start of the harvesting season. Kati Bihu is observed in the month of Kati (mid-October) when the harvest in the field is just in the growing stage, and the farmers’ granary is quite empty. Today, the first day of the Magh month, Magh Bihu is being celebrated to mark the end of the harvesting season. Bhogali comes from the word "bhog" which means to feast, and enjoy in luxury. The granaries are typically full around this time and the markets are abundant with seasonal vegetables and also with different type of poultry and meat. There is almost a month-long eating and feasting during this bihu. On the Sankranti between Puha and Magh month, Uruka is celebrated where communities, neighborhood or families get together to have a good hearty dinner with many mouthwatering delicacies. While typically the male members lead this meal preparation, the women stay back and prepare all kinds of sweet and savory traditional pancakes ("laru-pitha") and later join in for dinner. Meanwhile, young folks prepare makeshift huts known as “bhelaghar” or “meji” made from bamboo sticks and hay. Very early in the next morning, everybody will take bath and join each other to lit the meji and pray to the "God of Fire" for a happy healthy year ahead. "laru-pitha"s made the previous night are also served with a cup of tea which is savored while warming up to the heat of the bonfire.

I grew up in the city and while we did not have the most perfect and authentic version of Bihu celebration, my parents tried their VERY best to perform as much of the rituals as possible. Mine was a closely attached neighborhood and I remember there was a time when we had as many as 15-20 families joining in for “Uruka”. As we grew older, time changed and number of participant’s slowly started to decrease. But Bihu is still Bihu and no matter where you end up being, that longing to celebrate among your loved ones never goes away! The craving for the traditional laru-pitha becomes severe around this time as well.

My parents did a great job in helping us absorb all these cultural festivities and their signifance, and I now know enough to whip up one or two such “laru-pitha” during every bihu, whenever possible :-) Not to brag, but my kid sister has almost become an expert in making tilpitha; mom tells me she now single handedly takes care of the tilpitha section of our household! Proud sister over here :-) Today, I am going to share the recipe that my mom follows to make narikolor laru (narikol=coconut, laru= round ball)! I am hoping to particularly help anyone that craves for pitha-laru but finds the process intimidating and unattainable. I can assure you that it is not as tough as you may think. But like many other delectable delicacies, it needs a little bit of patience.

So, what ingredients will you need?
= Sugar, milk (or powdered milk), cardamom (smashed), coconut

Ingredients
Few notes before we start
  • Traditionally ripe coconuts that has hardened flesh but still water has not dried out) are used. Back home, we use a traditionally designed tool to grate the flesh. I don’t have that grater here and I have not researched much about any substitute tool either. But I have found an easy way! If you have an accessible Indian store near, you will find frozen grated coconut packets. The coconut is not grated as finely as I like but it does the job. 
  • You will need a wide pan with a rather thick bottom. This is to provide constant but minimal transfer of heat. Over the years, my mom has experimented with all kinds of cooking pans and pots before she settled with wide, thick aluminum pan. If you have a pressure cooker, that will work great too. That’s what I use.
  • The whole process needs time and patience. So, be mentally prepared!
After being completely cooked!
Here is the phase-I of the process -
  • Grate the coconut if you are using whole coconut. Be sure not to go all the way in to the hardened shell while grating, the brown residue from the shell will not be good if you want your larus to come out pristine white.  Or use the shredded coconut packet like me :-) 
  • I don’t adhere to strict ratios and measurements while cooking. But per my mom’s instruction, it should be 1 cup of sugar for each 2 cups of grated coconut. If I am being health conscious I reduce the amount to ¾ of a cup. Sugar acts as the main binding agent so if you put less it will get difficult to bind the larus properly. 
  • Mix coconut, sugar and smashed cardamom together in a big bowl and knead the mixture using your hands. At this point, you can check the sweetness level too and adjust accordingly. After mixing well, keep it refrigerated for 2 hrs. This is not absolutely necessary but my mom follows this step and her larus always are “oh-so-perfect”! Because I make these once or twice a year, I make time for extra two hrs. You can keep it overnight too!
  • Heat up your pan or cooker. Slow and steady heat is what you need. Typically I keep it at a lower than “medium”. I also keep an eye on the temperature and adjust accordingly. Too much of fast heat is not good.
  • When the cooker is heated up, add the mixture. No need to put anything else. The mixture is purely white in color at this point.
  • Keep stirring; don’t let the content stick to the pan. You may need to readjust the heat if the mixture is sticking a lot.
  • Keep stirring regularly. You will see that the sugar has started to melt and the coconut oil is slowly emerging.
  • After a while (say 20-30 minutes) you will see that the mixture has slowly turn more viscous and sticky, much richer, slightly yellow or creamy in color and also a bit transparent in nature. It is almost cooked.
  • Add milk (just a bit, I added about a ½ cup for 6 small cups of coconut) at this point. This will make sure that the final product remains white! We love our narikolor larus as white as possible!
  • Stir for some more time.
  • After 45 min to 1 hr., it should be properly cooked.
Before we go to the next phase, you will need,
A small bowl of water, a plate to take out scoops of the cooked mixture while making the larus, one bigger plate or tray to keep the larus that are formed.

Here is the phase-II of the process -

This final phase is where it needs some effort. You need to be a bit fast. The main complaint from anyone who has tried to make this is that the larus don’t bind and it becomes difficult to build and maintain that round cohesive shape getting crumbled. When you remove the mixture from heat, the next 10 minutes or so it retains the heat and the warmth from the melted sugar and oil from the coconut. So it is easier to make the larus within that time. That is why you need to be fast! If you have larger amount, the mixture may get cold; go ahead and reheat for some more time. This is also the reason why I will scoop a little bit out, make 4-5 larus out of that portion and then scoop the next portion. I remember my mom putting us to help her at this point; me, my sister and at times my aunt will work together to finish using up the entire cooked mixture. It was fun.

This little scoop will make 3-4 larus
Now that I have all the important points covered, let’s make the larus.
  • Scoop out a small amount of the cooked mixture.
  • I like small size larus! I can only manage to make smaller ones with my rather small hands :-)
  • From that portion take just a little bit guessing what size of laru you want. Keep squeezing it in your palms as shown; it will be a bit hot, so be careful. It will start to bind. You have to adjust the pressure from your hand because you want the laru to nicely stick together and form the round shape but not break under too much pressure.
  • Keep squishing and rolling for around 45 seconds to 1 mins. You will see that the original volume has shrunk into a somewhat rounder and tighter ball.
  • After I am happy with the shape and make it rounder to the best of my ability, I give it a quick swirl in between both my palms to smooth out any uneven edge and make it even rounder.
  • Follow the process. After every 3-4 larus, your hand may get a bit sticky from all the oil and sugary syrup; quickly dip your fingers in the water bowl and it will remove the stickiness.
  • Pull out another scoop and complete the process in batches till you are done.
  • The larus are ready; you can definitely try them at each point. Keep it on the tray for a few hrs. or overnight to make them firmer. Whenever I return here after vacation, my mom makes these and she always lets them dry overnight before packing them and they survive the overseas journey without breaking.


The entire process!!
I hope you enjoy them :-)

This year, Uruka was celebrated on Thursday night and by the time I am preparing this , the main rituals of Bihu are almost over, back home. But I have invited a few friends tonight who are also going to make another kind of pitha. We have a pretty hearty meal planned.

Hope you also have enjoyed this Bihu :-) and ate a lot :-) Here are some of the pictures that I collected from my sister, Ani and cousins Gyanashree, and Deepa.

Happy Bihu!!! 


Cake, Telpitha (Courtesy: Kakoli), Narikolor laru and Narikolr Bhoja Pitha
Laru Pitha from made and photographed by Ani, my little sister :-)
Laru Pitha from Aunts place, PC: Deepa!
Bhelaghar/Meji from my ancestral home. PC: Gyanashree
Love,
~Arrru

Saturday, January 9, 2016

Quick Look on my Lucky Bag 2016 from Beautylish!!!!

I reviewed a lot of new products, palettes and kits this past holiday season (you can check them here) and to be honest, it was almost tiresome :-) So, I took a little break and last couple of blog posts I have been talking about some old products that I dearly love!


Today, I am back with a brand new product! Well, it is a collection of products actually! I am surely going to individually review the products in due course of time but today lets take a super quick look on the contents of my “Luck Bag 2016 from Beautylish.

First of all, what is Beautylish? It is a Beauty website where you can join the beauty lover community, post pictures of makeup-work, access informative articles, read product reviews and shop from a lot of niche brands! I have been an online member ever since my tech savvy best friend introduced me to their online App back in January, ’14. As found in Wikipedia Lucky Bag is “a Japanese New Year custom in which merchants make grab bags filled with unknown random contents and sell them for a substantial discount, usually 50% or more off the list price of the items contained within”. Every year around Christmas, Beautylish brings out these lucky bags and they usually sell out very very quickly. This year’s is sold out long ago but you can sign up for 2017 here. Couple of things to know about these bags -
  • Lucky Bags are once-a-year bags exclusive to Beautylish; it’s not a regular subscription box.
  • They are typically mystery bags; meaning- you would not know beforehand what items you will be getting in your bag. That’s a risk to take! I have seen people getting unimpressive bags but  that’s the risk that comes with the whole process. Actually, to be honest, personally I thoroughly enjoyed the surprise factor.
  • Not all bags are alike, that essentially means all of them are not going to be of the same value. This year I have seen 5-6 different types of bag! Some people has got extra lucky and got around $250 worth of products.
  • They usually cost 75$ and they guarantee at least $150 worth of high end beauty products. I paid a total of 80$ that included a 5$ shipping charge. I do not actually understand the shipping charge as Beautylish generally offers free shipping on 35$ or more from their regular shop.
  • You cannot return the bag. But if your items arrive damaged or with any issue, it’s always a good idea to contact them. I have seen Beautylish team being very responsive to these issues.
I remember a everybody raving about these bags in 2014 but then in 2015, quite a lot of people were very disappointed with what they got for 2015. Now, Beautylish team is very serious about their “customer care” seriously and I was almost sure that they will put extra effort in curating this year’s bag. So I decided to take the plunge and invest in my very first Lucky Bag. Here is what I got-
  1. Natasha Denona Eyeshadow Palette 5 in #4 (Cost:$48, available here, also coming to Beautylish soon)
  2. Becca Under Eye Brightening Corrector (Cost: $30, available here)
  3. rms beauty Living Luminizer (Cost: $38, available here)
  4. Kevyn Aucoin The Pure Powder Glow in Myracle (Cost: $37, available here)
  5. Bioderma Sensibio H2O 100 ml (Cost: $6.95, available here)
  6. IT cosmetics Hello Lashes Clinically Proven 5-in-1 Mascara (Cost: $24, available in Beautylish, Ulta)
  7. Wayne Goss Brush 05 (Cost: $20, Available here)

Natasha Denona Eyeshadow Palette 5 in #4: This is definitely the star in my bag. When I opened the package and I saw “Coming Soon” peeking through the wrapping papers I almost squealed J This is where I totally absolutely enjoyed the surprise factor of the bag. These eyeshadows are quite expensive and I was not thinking about buying it at the regular price anytime soon. There are quite a few different 5-eyeshadow palettes but I love that I got #4. It contains warm, golden-coppery glitter and shimmer shades! I know that this is going to look flattering on me. They are very, very pigmented, I wore it today and so far I am happy. Check the detailed review here :-)

Becca Under Eye Brightening Corrector:  This is the product that I was most skeptical about. Don’t get me wrong; I love Becca products. But from the reviews of this product when it first came out, I felt this is not going to work on me. And my suspicion was not wrong. I don’t have horribly bad dark circles so I don’t really tend to look for this type of correctors. Anyway, this is way too pink. And being true to its name, it is very glow-y. I wore this today and I am not much enjoying the formula as well. It is kind-of settling on my fine lines and getting “frosty”, for lack of a better description. I really have to play around before passing on a final verdict. This is why I don’t support putting base face products like foundation and concealer in this type of set.

rms beauty Living Luminizer: This is another product that I am so super psyched about. I remember lusting after this product for years now. I always look at rms beauty and Ilia Beauty whenever I browse Beautylish shop. This is a gorgeous looking compact sturdy jar! I have been using a lot of heavy highlighters these past few months so this quite subtle and refreshing to me! It’s a pale pink-golden shade and it is a bit stiff. I feel like I have to bit of research on how to apply it but I am very hopeful that this is going to be great addition to my collection :-) Fingers crossed!

Kevyn Aucoin The Pure Powder Glow in Myracle: I thought Becca blushes are the most madly pigmented blush but this is even more pigmented :-) Kevyn Auction was an iconic makeup artist of yester years and I am excited to finally test out a product from his brand. Myracle is a matte neutral/cooler toned hot pink shade. Quite frankly, it is a bit intimidating to look at the pan. But you know me, I love bold colorful shades and I am definitely warming up to it. I wore it today and I initially put too much of it but it was easy to blend out. I will play with it more and report back.


IT cosmetics Hello Lashes Clinically Proven 5-in-1: I have quite a few mascaras to go through so I am not sure if I am going to open it soon. Mascaras do not excite me much! But, it’s a full size one and I am excited to try out one more product from IT Cosmetics.

Bioderma Sensibio H2O: This is a cult favorite make up removing product. I have bought it during their Black Friday sale and I have used it for 2-3 times now. It is really good but I am yet to declare it to be a miraculous product for me yet! But I have liked it when I used it. Also, I always appreciate a travel sized product.

Wayne Goss Brush 05: Wayne Goss brushes are so expensive, this tiny little brush retails for 20$. I will never see myself buying this product at regular price. It’s a nice little pencil brush. I have not used it yet, and when I do, I will definitely let you know if it is something worth 20$.

This was my first bag and overall, I do think I got much more then what I paid for. The total value of these products is $203.95. I have seen much better bags than this and also a few that are not as impressive like this. So apart from the Becca Corrector I absolutely don’t have any complaints. I am also very lucky in that I don’t own any of these products before! I also wasn’t really planning to buy these, so it’s really nice to get them in a mystery bag at half the price.

Will I buy it next year? I don’t know right now. I will analyze my financial health at that moment and decide accordingly :-)

How is the 2016 treating you?

Love,

~Arrru